Showing posts with label Blog Hop. Show all posts

Monday, August 18, 2014

Ho, Ho, Ho...

Why, hello there.  Long time, no speak.  Miss me?  I missed you!  My apologies for the ahem 6 months of bloggy silence but these days you are more likely to find me over on Instagram (@missymaccreations) so drop by and say 'hello'!


So, why am I back now?  Well, for the Ho, Ho, Ho... And On We Sew linky party, of course!  Huge thanks to Paula of Mud, Pies and Pins and Fiona of Celtic Thistle for asking me to be involved.

In honour of hosting this month, I have a fun little pattern to share with you - the Santa Belt.


Yes, it is paper pieced but never fear - it is super easy!  Even if you've never paper pieced before this is a very do-able design.  Don't be afraid.  Just maybe read this awesome post by the amazing Kristy first.

Santa Belt paper pieced pattern

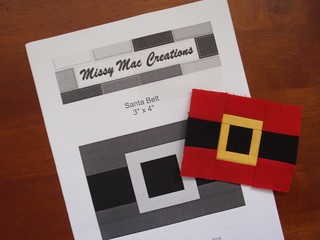
Finishing at just 3" x 4" this little piece of cuteness can be used for a variety of Christmas-themed goodies, either singularly or in multiples, such as: coasters, mug rugs, mini quilts, hot pads etc etc etc.  Let your imagination go crrrrrazy.

I had fun making mine into little zip pouches, perfect to hold gift cards for those impossible-to-buy-for friends.

OLYMPUS DIGITAL CAMERA

And, look, an elf belt too!  ;)

Would you like to make your own?  Then hop, skip and jump over to my craftsy store where you can download the pattern for FREE.  If you do make one (or a hundred) be sure to let me know.  I would love to see!

Big thanks to Kristy for working her magic with EQ7 and helping me make my little pattern look slightly more professional.

So, what have you been working on of late?  Got some more Christmas gifts crossed off of your to-do list?  Well, then, be sure to link up below!  The giveaway for August is a copy of this lovely Walk in the Woods Ornament pattern set from Alicia Paulson at Posie: Patterns and Kits to stitch


​The pattern set is a downloadable PDF so the winner will be stitching away in no time :)

And, as always, HUGE thanks to the amazing sponsors of Ho, Ho, Ho... and On We Sew.

Fluffy Sheep QuiltingRay Stitch HaberdasheryBackstitch

Quiet PlayQuilting Fabric at the Fat Quarter ShopPlush Addict Logo  Posie: Patterns and Kits to Stitch by Alicia Paulson


That's enough from me.  Time to get your link on!


E.

Tuesday, December 3, 2013

Big Hearted Girl

When I first saw these Awesomeville panels by the uber talented cat & vee I absolutely fell head-over-heels in love with the Big Hearted Girl.  I mean, how could I not?!  When I mentioned to Cat, one of the creators, that I'd definitely be buying her if my bubba turned out to be a girl... she then informed me that they also stocked larger 18" panels for cushion covers.  Well then... SOLD!

#widrn  Admiring my awesome new Big Hearted Girl cushion panel by @hellofromcat and @hellofromvee.  I love her!!! Tagged by @rachelwoodenspoon, tagging @quietplay,  @makingrebeccalynne and @fabricdonkey ;)

When she arrived I may have let out a little squeal - I loved her even more.  She's absolutely gorgeous!  I was desperate to make her into a cushion right then and there but couldn't decide exactly what to do.

In the end, I stayed with simple - to allow her to shine all on her own.  All I added was some cute blue pom pom trim - an idea I stole from Cat herself!

Big Hearted Girl cushion

Ahh... swoon!

I am so loving the pom pom trim too!  It was a first for me (but not the last!) so I followed this tutorial for help.  Admittedly it was a bit fiddly and a few pom poms might have not quite made it through unscathed - but it is totally do-able and worth it.  Just remember that slow and steady wins the race.  ;)

For the back I stuck with my usual zip method, and a few bright red prints that I had on hand.

Big Hearted Girl cushion

Unfortunately I only had a 16" insert spare - so I'll have to buy a bigger one when I'm next at the shops.  I do so like a plump cushion.

And, because I know you're dying to see, here she is hanging out with the Cutie Scootie Patootie and Haphazard Chevron cushions.

Big Hearted Girl cushion

I am loving how they look together!

Now, before I run, I must, must, must direct your attention to Kristy's post here.  She is today's Hostess with the Mostest for the Cushion for Christmas Blog Hop - and is also showcasing some gorgeous panels from cat&vee.  AND... wait for it... she may also have a little cat&vee giveaway in the works.  ;)

For more information on cat&vee check out their etsy shop, website and/or follow them both on IG - hellofromcat (Catherine) and hellofromvee (Vanita).  You won't be sorry!  I should also point out that this post has not been a paid endorsement - I am just a huge fan.  I'll definitely be shopping with them again!

E.
Sew Cute Tuesday

Linking up to Sew Cute Tuesday over at Blossom Heart Quilts.

Ms Midge

I'll also be linking up to the party for the Cushion for Christmas Blog Hop (on now!) at Ms Midge when it opens on Saturday 14th December.  Before then, be sure to check out all the fabulous ideas being showcased by some wonderful bloggers - and get working on your own cushions for Christmas!  :)

Thursday, December 6, 2012

TTT - Christmas Gifts for Kids from Kids

Thursday Think Tank Holiday Hop

Hello and welcome!  If you are new to my little blog then please allow me to introduce myself while you make yourself comfortable.  My name is Erin and, today, I'm the proud hostest of Becca's inspirational Thursday Think Tank Holiday Hop.

At this stage in my life I'm not lucky enough to have children of my own but I am blessed to be surrounded by lots of gorgeous kiddies, either through friends or work.  So... when given the opportunity to choose a topic for today's post I couldn't go past the idea of creating gifts for kids by kids.  Yep, I love any excuse to sit down and get my craft-on with a little friend.

Sooo... I have put together two extremely simple, easy-peasy tutorials for you.  These little gifts are perfect for classmates, friends, team mates, neighbours etc etc and, I have no doubt, will become firm favourites for you all.  I mean, they are cute and include treats so, really, how can you go wrong?!  ;)


Candy Cane Reindeer - finished product

First up are these incredibly delectable Candy Cane Reindeers.  I used to make these when I was younger and hang them on the tree; display them en masse in a vase; tuck them into the ribbon on presents - whatever!

CANDY CANE REINDEERS


Candy Cane Reindeer - what you need

For each reindeer, you will need:

          1 candy cane, standard size
          1 pipe cleaner / chenille tube, cut in half (approx. 6")
          2 small googly eyes
          1 small pompom
          Glue   

Simply, twist the pipe cleaner around the top of the candy cane, to secure, and then bend to create the antlers.  Glue on the eyes and nose and VIOLA - you're done!

Did I say "easy-peasy" or did I say "easy-peasy"?! 


Lollypop Nose Reindeer - the finished product

Secondly are these card reindeers - with a yummy lollypop nose!  Admittedly, this one is not my own design but after seeing a teacher make them for her class last year I filed the idea away - and am happy to be able to share it with you now.

LOLLYPOP NOSE REINDEERS 

EDITED 1st December 2013 - 
This tutorial can now be found in a free downloadable form (with templates!!).  
Click here for more information. 

Lollypop Nose Reindeer - what you need

For each reindeer, you will need:

          1 lollypop
          1 piece of coloured card, A4 size
          Pencil
          Scissors
          Glue
          Glitter, felt pens, whatever supplies you need to decorate 


STEP 1 - Draw your reindeer shape

Lollypop Nose Reindeer - drawing your shape

Fold the card in halfCrease and open out.  Draw or trace your reindeer outline (yes, you may use mine), being sure to have it's chin finishing on the fold mark.  

Don't forget a little hole for the lollypop stick and a bigger hole for the nose.

Pencil is fine for this step, I've just outlined it in Sharpie to make it a little clearer for you.


STEP 2 - Cut out your reindeer shape

Lollypop Nose Reindeer - cutting out the reindeer

Re-fold the card along the crease and cut around your shape, through both bits of card.  As the lollypop needs a piece to sit on, don't cut all the way around the chin, instead leave a join.

Yes, it might be a tad safer if an adult did this step.


STEP 3 - Decorate

Lollypop Nose Reindeer - time to decorate

Time to let the kids (big or little) go crazy with the glitter and felt pens.  Let their own creativity shine.


STEP 4 - Finish & Gift

Lollypop Nose Reindeer - the finished product - front and back

Insert the lollypop, fold closed and pop in a little glue dot to hold the card in place.  Give to your favourite mini mates.  Yay!


Well, there we are.  Two adorable, little, easy and cost-effective gifts for Christmas.  I hope you have lots of fun making these with the kiddies (or even by yourself!).  Don't forget to send me pics.  And... if you know of any more great tutorials for gifts for kids by kids then please leave me a link in the comments.  I'm always on the look-out for new ideas!  :)


I really hope you have enjoyed my little contribution to the Thursday Think Tank Holiday Hop.  I'm actually the 6th stop on this little tour, so if you've missed any of the lovely posts so far be sure to check them out soon.  You can find the whole line up below...


November 1 - Making Rebecca Lynne DIY Christmas Cards

November 8 - Piecemeal Quilts Thanksgiving Etiquette (when you are lucky enough to be a guest!)

November 15 - Canadian Abroad Holiday Decor
November 22 - Seriously...I Think it Needs Stitches & MRL free pillow cover pattern

November 29 - She Can Quilt Gifts for Tweens/Teens/Twenties

December 6 - Missy Mac Creations Christmas Gifts for Kids from Kids

December 13 - Rainbow Hare Quilts Wrapping it Up
December 20 - YOU!  DIY Christmas Party Link Up


And, yes, you even have the chance to play along and win some fab prizes...


Prizes?  


Now, it's over to you...

WHAT IS GOING ON IN YOUR THINK TANK THIS WEEK?  
HERE ARE THE RULES! 
  1. Link up any post from the past week that features some creative thinking going on in your creative world.   It can be anything, quilting, home improvement, fashion, crafting, DIY gifts, cooking...whatever you have recently thought "hmmm, you know what I should create" is perfectly appropriate for the Think Tank.  TTT is all about whatever you are currently brainstorming and would like feedback or encouragement on!
  2. Somewhere in your post, link back here to my blog. (Or grab the T.T.T. button for your sidebar.)
  3. Comment on at least a few of the other links—because what fun is a linky party without comments?