Of late, I have been getting A LOT of interest in my Reindeer Lollipop Critters but, thanks to my non-existent technological skills, it seems I've created a whole heap of confusion when I switched blog names. So, in the interests of making things easier for all, I am reposting the pattern here...
ENJOY!!
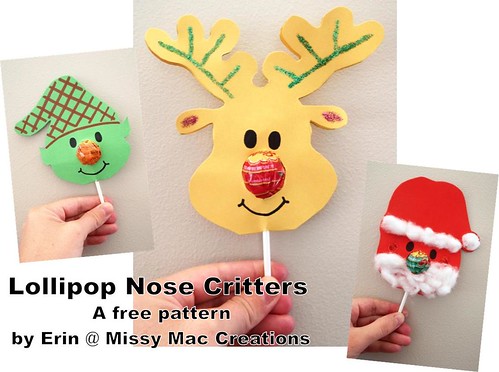
I first showcased the Lollypop Nose Reindeer tutorial in 2012 (see here) but as it was mind-blowingly popular I thought I'd write up a little update, with a printable PDF pattern AND templates. And not just one little reindeer template, oh no, now you can also make a cheeky elf and a rather handsome Santa. Fun!
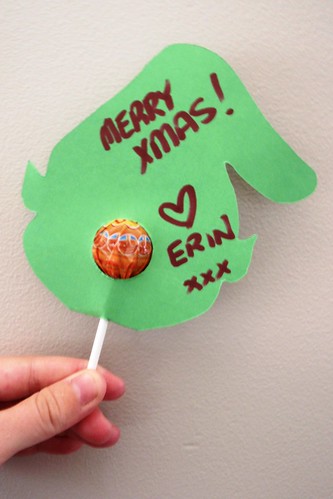
I have to say, these little critters are so cute - you'll want to get the kids together and make a whole bunch. They are perfect for everyone - especially as gifts for classmates. Write a little message on the back and you don't need to include a separate card. Win win!
Cute, yes?!
Want to make your own? Well, of course you do. So... I am proud to offer everyone the tutorial and templates for FREE. Yippee! All is ask is that you rightfully respect my pattern and not re-sell it in any way, shape or form and/or any items made from it. Fair enough? Good-o. :)
Sorry but you will need a Craftsy account for the download but, if you don't have one already, never fear - they are free and easy to sign up for. Plus they are definitely worth having to access some amazing and creative patterns and classes. You'll be gobsmacked, believe me.
I truly hope that you have fun creating these lovelies. Please, please, please send me pics if you make them as I'd love to see!
Why, hello there. Long time, no speak. Miss me? I missed you! My apologies for the ahem 6 months of bloggy silence but these days you are more likely to find me over on Instagram (@missymaccreations) so drop by and say 'hello'!
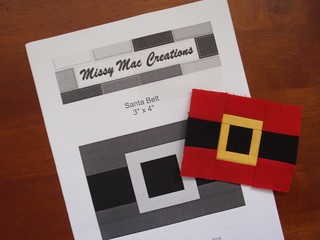
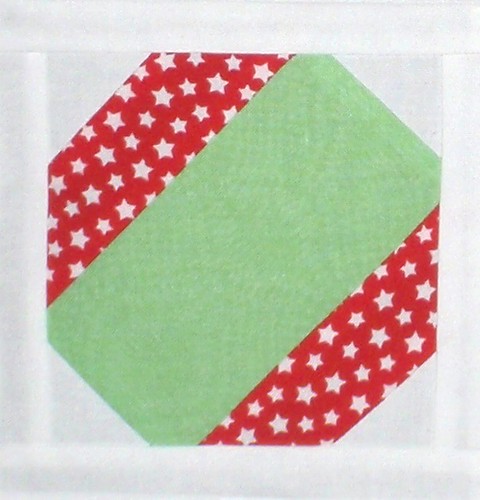
In honour of hosting this month, I have a fun little pattern to share with you - the Santa Belt.
Yes, it is paper pieced but never fear - it is super easy! Even if you've never paper pieced before this is a very do-able design. Don't be afraid. Just maybe read this awesome post by the amazing Kristy first.
Finishing at just 3" x 4" this little piece of cuteness can be used for a variety of Christmas-themed goodies, either singularly or in multiples, such as: coasters, mug rugs, mini quilts, hot pads etc etc etc. Let your imagination go crrrrrazy.
I had fun making mine into little zip pouches, perfect to hold gift cards for those impossible-to-buy-for friends.
And, look, an elf belt too! ;)
Would you like to make your own? Then hop, skip and jump over to my craftsy store where you can download the pattern for FREE. If you do make one (or a hundred) be sure to let me know. I would love to see!
Big thanks to Kristy for working her magic with EQ7 and helping me make my little pattern look slightly more professional.
So, what have you been working on of late? Got some more Christmas gifts crossed off of your to-do list? Well, then, be sure to link up below! The giveaway for August is a copy of this lovely Walk in the Woods Ornament pattern set from Alicia Paulson at Posie: Patterns and Kits to stitch
The pattern set is a downloadable PDF so the winner will be stitching away in no time :)
And, as always, HUGE thanks to the amazing sponsors of Ho, Ho, Ho... and On We Sew.
Today I am stoked to be hosting this week's Making Christmas link up with a super fun & super easy tutorial so please come on in.
If you are new to my little part of Blogland, my name is Erin and I hail from the gorgeous Perth in Western Australia. I have dabbled with various craft forms nearly my entire life and even though I now spend more time quilting than anything else, I still can't resist the occasional opportunity to play with paper, scissors, glue, felt pens and, of course, glitter. So, on that note...
... please allow me to re-introduce the rather adorable Lollipop Nose Reindeer.
I first showcased this tutorial last Christmas (see here) but as it was mind-blowingly popular I thought I'd write up a little update this year, with a printable PDF pattern AND templates. And not just one little reindeer template, oh no, now you can also make a cheeky elf and a rather handsome Santa. Fun!
I have to say, these little critters are so cute - you'll want to get the kids together and make a whole bunch. They are perfect for everyone - especially as gifts for classmates. Write a little message on the back and you don't need to include a separate card. Win win!
Cute, yes?!
Want to make your own? Well, of course you do. So... I am proud to offer everyone the tutorial and templates for FREE. Yippee! All is ask is that you rightfully respect my pattern and not re-sell it in any way, shape or form and/or any items made from it. Fair enough? Good-o. :)
Sorry but you will need a Craftsy account for the download but, if you don't have one already, never fear - they are free and easy to sign up for. Plus they are definitely worth having to access some amazing and creative patterns and classes. You'll be gobsmacked, believe me.
I truly hope that you have fun creating these lovelies. Please, please, please send me pics if you make them as I'd love to see!
That's me done for this week. A BIG thank you to Janine and Rebecca for organising this fabulous blog hop and allowing me to play host.
Next Saturday will be hosted by my lovely friend Lucy. In the meantime, if you'd like some more information on Making Christmas, then check out Janine's post here. It's not too late to play along so grab a button and write that list!
Now, it's over to you. How is your Making Christmas list shaping up? Link up with your latest blog post showing off your progress. We are here to ooh and ahh and cheer you on afterall!
E.
Hello and welcome! If you are new to my little blog then please allow me to introduce myself while you make yourself comfortable. My name is Erin and, today, I'm the proud hostest of Becca's inspirational Thursday Think Tank Holiday Hop.
At this stage in my life I'm not lucky enough to have children of my own but I am blessed to be surrounded by lots of gorgeous kiddies, either through friends or work. So... when given the opportunity to choose a topic for today's post I couldn't go past the idea of creating gifts for kids by kids. Yep, I love any excuse to sit down and get my craft-on with a little friend.
Sooo... I have put together two extremely simple, easy-peasy tutorials for you. These little gifts are perfect for classmates, friends, team mates, neighbours etc etc and, I have no doubt, will become firm favourites for you all. I mean, they are cute and include treats so, really, how can you go wrong?! ;)
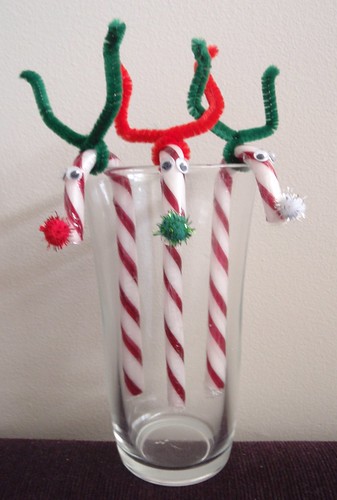
First up are these incredibly delectable Candy Cane Reindeers. I used to make these when I was younger and hang them on the tree; display them en masse in a vase; tuck them into the ribbon on presents - whatever! CANDY CANE REINDEERS
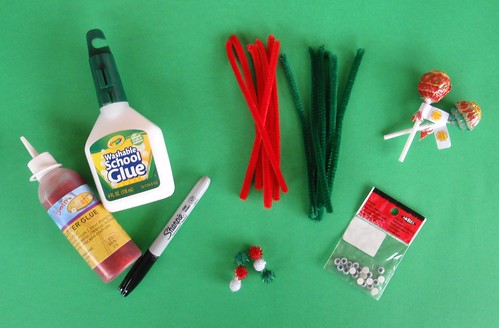
For each reindeer, you will need:
1 candy cane, standard size 1 pipe cleaner / chenille tube, cut in half (approx. 6") 2 small googly eyes 1 small pompom Glue
Simply, twist the pipe cleaner around the top of the candy cane, to secure, and then bend to create the antlers. Glue on the eyes and nose and VIOLA - you're done!
Did I say "easy-peasy" or did I say "easy-peasy"?!
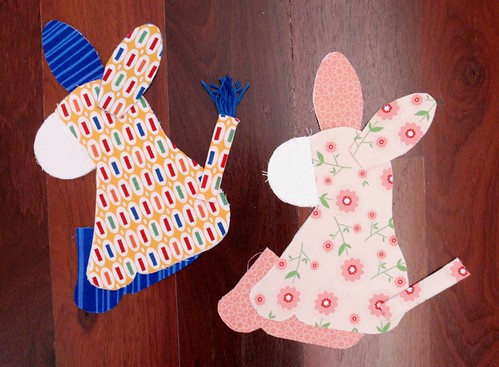
Secondly are these card reindeers - with a yummy lollypop nose! Admittedly, this one is not my own design but after seeing a teacher make them for her class last year I filed the idea away - and am happy to be able to share it with you now.
LOLLYPOP NOSE REINDEERS
EDITED 1st December 2013 -
This tutorial can now be found in a free downloadable form (with templates!!).
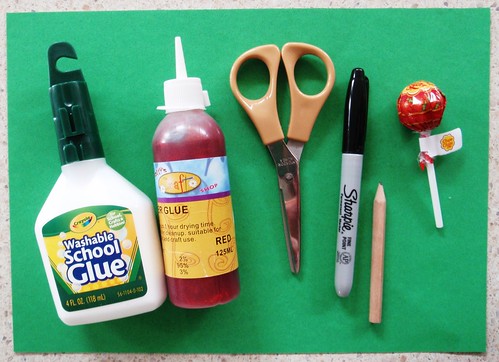
1 lollypop 1 piece of coloured card, A4 size Pencil Scissors Glue Glitter, felt pens, whatever supplies you need to decorate
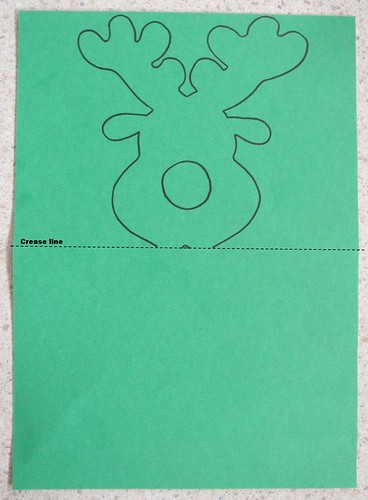
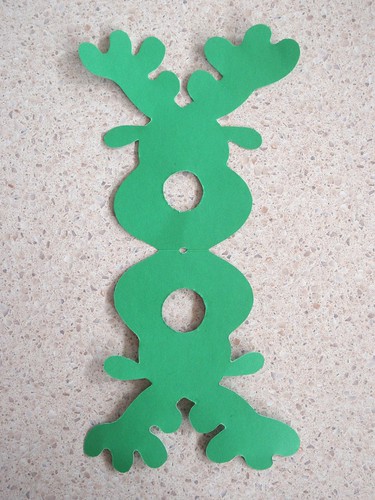
STEP 1 - Draw your reindeer shape
Fold the card in half. Crease and open out. Draw or trace your reindeer outline (yes, you may use mine), being sure to have it's chin finishing on the fold mark.
Don't forget a little hole for the lollypop stick and a bigger hole for the nose.
Pencil is fine for this step, I've just outlined it in Sharpie to make it a little clearer for you.
STEP 2 - Cut out your reindeer shape
Re-fold the card along the crease and cut around your shape, through both bits of card. As the lollypop needs a piece to sit on, don't cut all the way around the chin, instead leave a join.
Yes, it might be a tad safer if an adult did this step. STEP 3 - Decorate
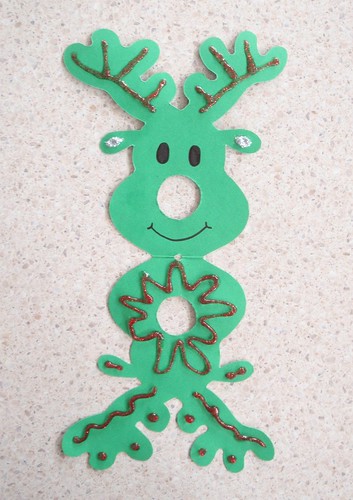
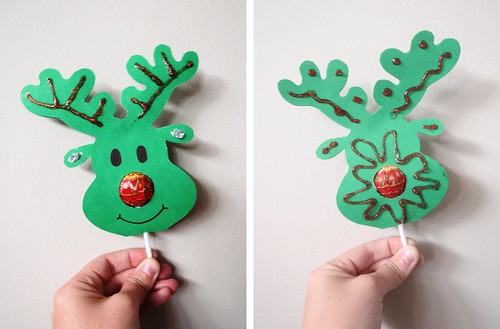
Time to let the kids (big or little) go crazy with the glitter and felt pens. Let their own creativity shine. STEP 4 - Finish & Gift
Insert the lollypop, fold closed and pop in a little glue dot to hold the card in place. Give to your favourite mini mates. Yay! Well, there we are. Two adorable, little, easy and cost-effective gifts for Christmas. I hope you have lots of fun making these with the kiddies (or even by yourself!). Don't forget to send me pics. And... if you know of any more great tutorials for gifts for kids by kids then please leave me a link in the comments. I'm always on the look-out for new ideas! :) I really hope you have enjoyed my little contribution to the Thursday Think Tank Holiday Hop.
I'm actually the 6th stop on this little tour, so if you've missed any of the lovely posts so far be sure to check them out soon. You can find the whole line up below...
Link up any post from the past week that features some creative thinking going on in your creative world. It
can be anything, quilting, home improvement, fashion, crafting, DIY
gifts, cooking...whatever you have recently thought "hmmm, you know what
I should create" is perfectly appropriate for the Think Tank. TTT is
all about whatever you are currently brainstorming and would like
feedback or encouragement on!
Somewhere in your post, link back here to my blog. (Or grab the T.T.T. button for your sidebar.)
Comment on at least a few of the other links—because what fun is a linky party without comments?
Unfortunately things are a bit shit around here at the moment. Sorry if that sounds a tad dramatic but I can't even be bothered to be eloquent right now - so 'shit' it is. Or 'crap'. Or, hey, I'll even accept 'sucky'. ;)
So... I've decided to follow Dory's advice and have been keeping moving by jumping around from project to project to project.
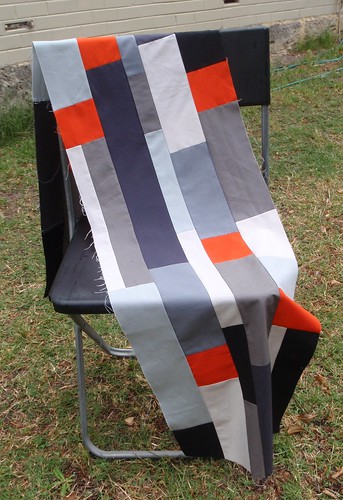
As quilting stresses me out and requires way too much thinking I've instead starting another quilt top. I know, I know, it's pathetic but in my defence I need to make a few for some up-coming births so it won't go to waste or just languish (with all the others) for years on end. I promise. A-huh.
It's a very simple strip design, with various Kona greys, black and some bright orange squares thrown in randomly for a pop of colour. It currently measures 65" long. We shall see how wide she gets. ;)
I have to admit, I'm loving the simplicity - and the lack of thought needed to get this made. Perfect! I may not be making it the most efficient way but I like that I can just cut and sew, cut and sew without thinking too far ahead. It's totally working for me right now.
My next project has been all about FUN as tomorrow I am playing host to the lovely Becca's Thursday Think Tank Holiday Hop.
Today I've had a ball mucking around with some card, glitter, glue etc etc and making a general mess.To find out more, and join in the fun, be sure to pop back and check out my two (!!!) easy-peasy, kid-friendly tutorials.
Now, away from the sewing machine / crafty table, I've also been planning our wedding.
WHAAAAT?! Well, honestly, we have been engaged since July but had no real plans for a ceremony, until about a week ago when I jumped in head-first and started making arrangements. For, like, less than 6 months time. I can be a little crazy and spontaneous like that. Anyhoo... more on that another time. I know, I'm such a tease. ;)
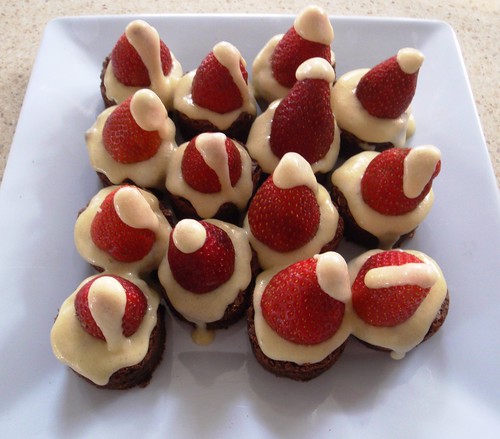
Lastly, with Christmas around the corner, it's time to really start thinking about all the events and social occassions that surround the day. After pinning these gorgeous brownies some time ago, I knew I wanted to take them to Christmas lunch... so figured I'd better have a trial run first.
Ta da!
Unfortunately they didn't turn out exactly as planned, with the icing a little runny and not bright white (how do they do that??!) but they still tasted pretty yummy. I ended up sending them to Mr C's work so I wouldn't scoff them all myself (yep, I've been eating for Australia lately and am starting to get more wide than I am tall!).
It did make me laugh, though, how all these amazing ideas pop up on Pinterest and make us believe we can do the same - only to have not-so-fabulous results. Come on, fess up, I know you've been there to!
Even so, I'm happy to report that my attempt wasn't nearly as bad as some of the spectacular misses in this post - 17 Pinterest Fails. Trust me, if you need a good laugh then check out that link! I'm still giggling over the family portrait. :)
E.
Linking up to WIP Wednesday at Freshly Pieced, hosted this week by Elizabeth of OPQuilt.
Yep, it's on again - Pip's fabulous Softies for Mirabel campaign. Into it's SIXTH (!!!) year, Softies for Mirabel is a worldwide call-out for donations of handmade toys to be given as extra special Christmas gifts to Mirabel children. As stated on the Mirabel Foundation website:
"Every year the toy drive is open to all crafty participants who wish to
knit, crochet or sew a Softie or two. Participants are encouraged to be
as creative as they like as each Softie will be matched to the age, likes
and needs of a Mirabel child."
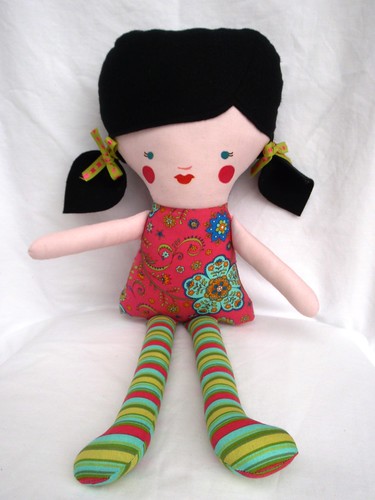
For last year's drive I made and donated this little giant dolly for a special little girl...
I must admit, it was quite exciting to see that she had arrived at Mirabel HQ safe and sound AND was happily making new friends.
Photo courtesy of The Mirabel Foundation on flickr
Can you spot her? I think she might be a little shy. ;)
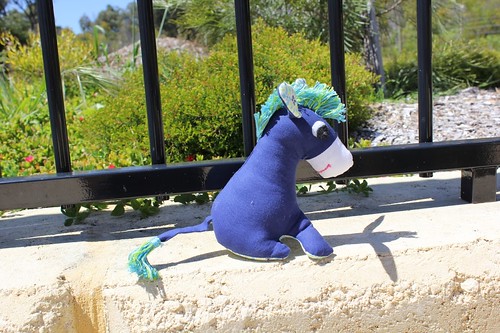
Of course, now that the 2012 campaign has begun, I just had to jump back on board. Infact, I have already started making two little softies, one for a boy and another for a girl.
Any guesses what these little guys are destined to be? I know, it's probably no real surprise - I am making more donkeys, just like Deirdre (below) and Damien.
Photo courtesy of Laura of Quokka Quilts.
One may think that after Donktober I'd be sick of the sight of asses but that'll never ever happen. Of course, I only speak for myself as, upon commencement of sewing these lovelies, Mr C rolled his eyes and Laurie, my beloved Brother, decided he'd had enough of all things donkey-related and is now refusing to sew another stitch. Bad Laurie!
Luckily for me, the Softies for Mirabel mailbox doesn't close until 20th December, so I have plenty of time to get Laurie to the doctor... and then get those little donks finished and sent.
What about you? Will you be donating some handmade love for this worthwhile cause? I really really really think you should. To be honest, if I were you, I'd take this awesome opportunity to make some gorgeous little donks (free pattern available here) and then enter them into the Donktober linky party, which is open til Friday! Seriously, there are some awesome prizes and the odds are looking good. Help the Mirabel kiddies and get yourself in the chance for some free goodies at the same time. Win, win, win, I say!! ;)
Or, just be a good citizen and do it for the love by making any soft toy you can imagine and send it to Pip at:
Softies for Mirabel
Meet Me at Mike's
63 Brunswick Street
Fitzroy VIC
AUSTRALIA
Lastly, don't forget to link your creation up to the Softies for Mirabel flickr group. I know I'd love to see what you all donate.
Today I'm proud to host the Sew Seasonal Blog Hop, organised by the talented Kristy of Quiet Play and Alyce of Blossom Heart Quilts.
If you're yet to hear about this fun Christmas-inspired hop then be sure to click on the button below to learn more... AND... visit all the other hoppees to see the wonderful projects on offer.
So, what have I contributed to this rather intimidating line-up?
Well, I was allocated block #7 from Alyce's cute pattern, Ornamental, and decided to make the 5" version...
... but I had so much fun whipping it up I couldn't stop at just the one...
O(rnamental) Christmas Tree - top
No, your eyes aren't decieving you - I went a little crazy and made 11 / 12 of the designs! Oopsie. ;)
As you can see, I joined them in a Christmas Tree shape with the intention to make it into a wall-hanging, perfect for festive decorating. Unfortunately my Christmas-y fabric is hiding somewhere in an unpacked box so even though I know I have the perfect charm pack of Ready, Set, Snow waiting to be used, I had to make do and just hope I still generated the festive spirit. Did I manage to pull it off??
It currently measures 20 1/2" x 25 1/2" but now I'm stuck umming and ahhing over a possible border and, as per usual, how to quilt it. Please help! Honestly, all suggestions would be very much appreciated as I hope to have this finished in time for the linky party on November 30. Ahh!
Huge thanks to Kristy and Alcye for allowing me to join in the Sew Seasonal fun.
Now... pop over to visit Janice to see what cuteness she's created (drool!)... and then tomorrow two of my favourite bloggy friends are playing host - Lucy and Becca. Yay!