Saturday, October 6, 2012

DONKTOBER + TPSBH = Fun!


This post is part of Donktober 2012.  For more information please see here.

Admittedly, when Laura first asked me to be a part of her Travellin' Pic Stitch Blog Hop my immediate response was
"get lost"  "no thankyou, ma'am".  The thought of adding another string to my bow (I was an EPP virgin) right in the middle of Donktober and moving house was, putting in mildly, not something I was interested in.  At all.

Yet, somehow, here we are.  And, I begrudgingly concede, I am sooooo glad I
was bullied into it caved and signed up.  Yep, I'm a complete and utter EPP convert and, against my strongest inklings to the contrary, really enjoyed the process.  I definitely see more of this method in my future.

Ok, I'd better take a step back, for those of you who have no idea what I am on about (Mum?) and explain what exactly "this method" is.   Basically, EPP stands for English Paper Piecing and refers to:


"a hand sewing technique, used to maximize accuracy when piecing 
complex angles together.  A paper shape is cut with the exact dimensions 
of the desired piece.  Fabric is then basted to the paper shape.  Adjacent 
units are then placed face to face and the seam is whip stitched 
together.  When a given piece is completely surrounded by all 
the adjacent shapes, the basting thread is cut, and the basting and 
the paper shape are removed."
~ from  Wikipedia

 So, um, clear as mud now?

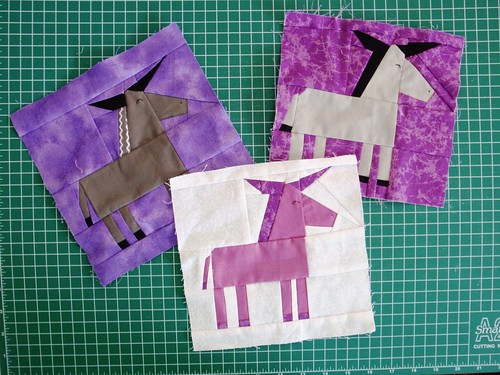
There are lots of gorgeous patterns and designs out there to choose from but, for this, my very first time, I decided on Katy's gorgeous Spring Carnival tutorial.  I figured it would expose me to a few different shapes to see what I liked (hexies) and what I didn't (triangles).

Instead of the suggested 2" shapes, though, I re-jigged it to best fit the fabric I wanted to feature in the centre - a donkey, or course.  So, for my particular block, 1 3/4" squares, triangles and hexagons were used.

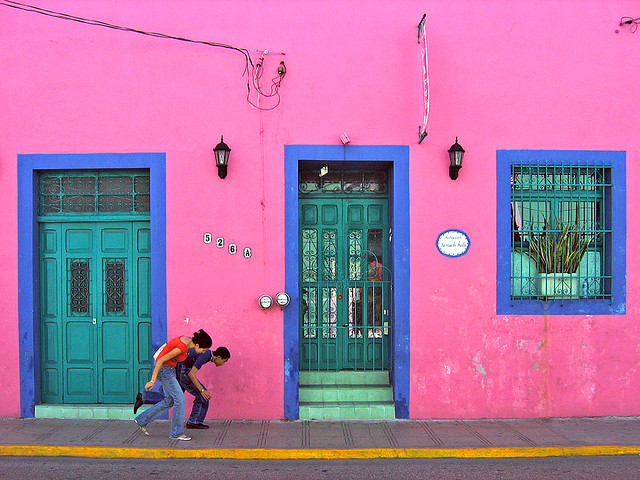
Now that I'd chosen a pattern and had the necessary donkey element sorted, it was time to start figuring out a colour palette.  The Travellin' Pic Stitch Blog Hop is all about using inspiration from travel photographs, so with our fiesta housewarming coming up and asses on the brain - I looked straight to Mexico.

I love, love, luuuuurve their brightly coloured houses and cheery streetscapes.  Wouldn't it be fun to live in a house like this..
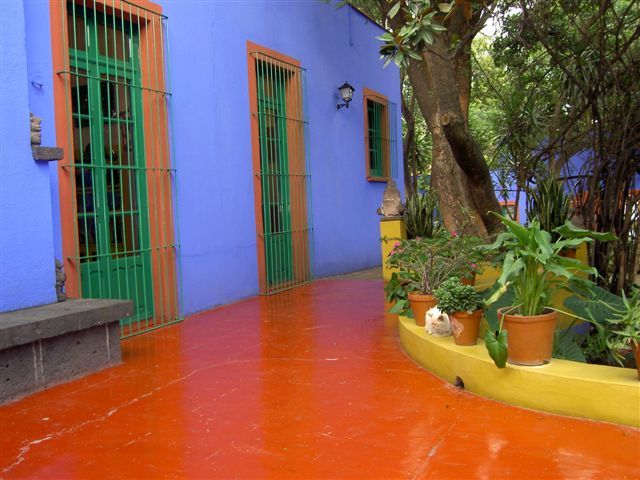

Source

Or this...


Source

Or this...


Source

Somehow I can't see Mr C letting my paint the new house pink but, for this project, those colours work perfectly.


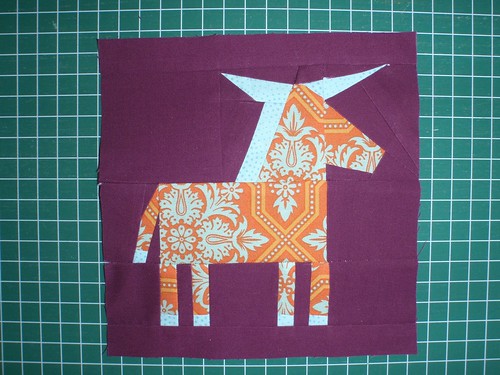
So what does the Spring Carnival block plus a donkey plus pink, aqua and white equal?  Well... how about this sweet little cushion / pillow.

 
PILLOW - Le Burro at the Fair, english paper pieced
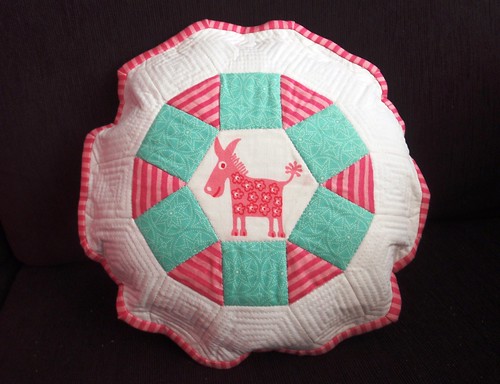
El Burro at the Fair

The little ass in the centre is sooo sweet and makes me smile every time.  He is from Senor Burrito by Alexander Henry.  The aqua is from Summer House by Lily Ashbury and the pink stripes are by Me and My Sister.
 
I've actually pieced the white border too - for three reasons.  (1) it gave me more opportunity to practice my new mad skillz; (2) my sewing machine was packed at the time in preparation for the big move; and (3) I knew I wanted to quilt it by echoing the various shapes.


PILLOW - Le Burro at the Fair, english paper pieced, close up

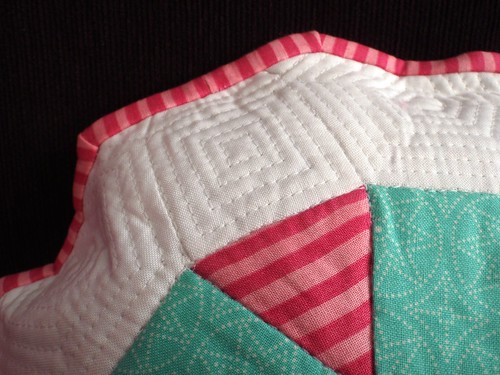
As this whole project was basically new for me I thought I might as well go all out with the binding too - so I tried this technique from From the Blue Chair.  It wasn't nearly as scary as I thought it would be.

Thanks to Laura and Katy for hosting this fabulous blog hop.  I have really enjoyed the opportunity to challenge myself - and am stoked with the results.


Also, a big thanks to you for popping in.  Don't forget that tomorrow's host of the TPSBH is Sarah Fielke of
The Last Piece.  I'm sure she has something extra special up her sleeve to show off.

E.


Here's the fine print...


This post is part of the Travellin' Pic Stitch Blog Hop.  From 1st October - 30th November we are hopping all over the world EPP-ing in some fantastic locations.

Check out the full list for October & November here and be sure to check out the other participants.


On 30th November it's over to you to link up for a chance to win these fabulous prizes!  Sponsored by Paperpieces.comFabricworm, Pink Castle Fabrics Marmalade Fabrics, the Fat Quarter ShopWantItNeedItQuilt, and Aurifil.

Full details for competition entry can be found here.

Friday, October 5, 2012

DONKTOBER - Paper Pieced Donkey


This post is part of Donktober 2012.  For more information please see here.

Today's Donktober Hostess with the Mostest is Kristy from Quiet Play.  I affectionately call Kristy the "Paper Piecing Queen" as she has a genuine love and knack for all things foundation pieced.  So, when I needed someone to create a special donkey block for Donktober she was the first person who popped into my mind.

Luckily for me (and you!) Kristy more than willingly agreed to not only design her own donkey - but also to provide the pattern and a tutorial FREE.  How lovely is that?!

DONKEY PAPER PIECED BLOCKS - by Kristy of Quiet Play
Paper Pieced Donkey blocks by Kristy of Quiet Play

Cute, yes?  YES!  And, just to prove to you that the pattern is very do-able, even for beginners, I had a crack too.

Donkey Paper Pieced Block by Missy Mac Creations

It's not exactly perfect (gasp) but this is only the third paper pieced block I've ever made - so if I can do it YOU CAN TOO!  Seriously.

I've never worked with this colour combination before but like how the Kona Berry, Heirloom's Tile Flourish in Amber and Verandah's Medallion Dots in Aqua all come together.

When I started it last night (yes, I'm a bit of a last minute worker) I had grand plans to make it into a tote bag but, alas, bed called before I could get it done.  Hopefully I'll get a bit of time later today to finish it up, though, so I can join the TGIFF linky party and enter their wonderful competion -  OctoberQuest.

Sorry, I know I'm yabbering on and on... BUT... before I let you head off to see Kristy's tutorial, I just want to quickly show you the extra goodies she sent me with her sample donkey blocks.  I mean, here was a woman that I had asked to do me a favour - and she sends me gifts?!?!  What a sweetheart.

Donkey presents from Kristy of Quiet Play

Cuzco by Kate Spain = drool!  And I adore the little donkey goodies.  It makes me chuckle that friends now think of me whenever they spy an ass.  He he he.  ;)

Speaking of cute softies (we were, right?), don't forget to drop by Becca's and enter her giveaway.

Ok, off you go now.  Find Kristy's awesome pattern and tutorial HERE.

Donktober

Tomorrow I will play host again, with a special project that not only incorporates Donktober, but also the Travellin' Stitch Pic Blog Hop.  Come by to see my first ever english paper pieced project.  Ahh!

E.

Wednesday, October 3, 2012

DONKTOBER - Softie Pattern Review


This post is part of Donktober 2012.  For more information please see here.

Before you head over to making rebecca lynne to see Becca's fabulous softie and pattern review (and enter her giveaway!), I'd like to quickly introduce you to Deirdre, the travelling donkey.

Deirdre the Donkey, side shot
Photo thanks to Laura of Quokka Quilts

With her blue and green mane and DS highlights, Deirdre is a total spunk who enjoys the outdoors, adventures and hugs.

Deirdre the Donkey, among the flowers
Photo thanks to Laura of Quokka Quilts

For her first overseas holiday, Deirdre is off to the US and Sewing Summit with Laura, so stayed tuned for her random travelling pics throughout the month.

Deirdre the Donkey parties hard
Photo thanks to Laura of Quokka Quilts

And, well, with Laura and Katy as chaperones I suspect that such photos will be a frequent addition.  Poor donkey!

That's enough about Deirdre, for now.

So, do you want to make your own adorable donkey friend?  Then pop over to Becca's house to meet her gorgeous bundle of joy, find the pattern link, read the review and... then... enter her giveaway.  Yippee!

Donktober

This Friday is Kristy's turn to host the Donktober party - so be sure to head to Quiet Play for an extra special treat from the "Paper Piecing Queen" (TM).  No prizes for guessing what her project is.  ;)

E.

Monday, October 1, 2012

DONKTOBER - Button Donkey Tutorial


This post is part of Donktober 2012.  For more information please see here.

Welcome to the first post for Donktober - a month full of donkey-related craft and a chance for you to let your hair down and really party your ass off.  Bad pun aside, I hope you will join me in the silliness and make some projects of your own.  We'll be having a link-up next month and I can't wait to see your creations.  More information on that to come.

So, let's kick off with a small tutorial for a button donkey.  I mean, seriously, buttons + donkeys = bliss.  Right?  Right!

DONKEY BUTTON ART - completed and framed

Before we start, though, I would like to point out that this gorgeous idea is not my own - I "borrowed" it (with permission!) from Dot's lovely blog, Busted Buttons.  Thanks Dot!

YOU WILL NEED:

Assorted buttons
Pencil
Watercolour paint
Felt pens - for the mane, tail and grass
Googly (yes, it's a word) eye
Hot glue gunk
Canvas board or stiff card
Card for stencil
Frame

STEP 1 - PREPARE A FOUNDATION:

DONKEY BUTTON ART - Step 1 - Trace & Fill with Watercolour
 
Make a stencil of your donkey and trace it onto your canvas (yes, you may use the same donkey as me).  Fill in your design with paint - matching the colour of your buttons.  This creates a solid foundation to glue your buttons to.

STEP 2 - GLUE ON THE FIRST LAYER OF BUTTONS:

DONKEY BUTTON ART - Step 2 (half) - Cover painted design with buttons

Using your glue gun, start attaching your buttons to your donkey.  Play with different sizes to help cover the space as much as possible.  Don't stress though - we'll do another layer to help cover the gaps.

You should end up with something like this -

DONKEY BUTTON ART - Step 2 - Cover painted design with buttons

Leave it to dry.

STEP 3 - GLUE ON THE SECOND LAYER OF BUTTONS:

Repeat step 2, above, working to fill in the gaps by overlapping the buttons as you go.

STEP 4 - ADD THE FINISHING TOUCHES:

DONKEY BUTTON ART - Step 4 - Glue on eye and draw in mane, tail and grass

Finish off your donkey by attaching an eye; and drawing on a mane, fluffy tail and some grass for him to munch on.  Viola!

Thanks again to Dot of Busted Buttons for letting me re-work her original button elephant, especially for Donktober.  Be sure to stop by to check out her gorgeous creations.  And don't forget to say 'hello'.

Donktober

On the Donktober schedule for this Wesnesday is Becca over at making rebecca lynne.  Be sure to check out her adorable donkey softie, the pattern review and... maybe she'll even spoil you with a giveaway.  Fun!

E.

Wednesday, September 26, 2012

WIP - The Renovation Continues

With our move-in deadline fast approaching (this Sunday!!!!) we have been busy over the last few weeks getting as much done as possible.

Installing first wall cabinet in kitchen

Excitingly, all the kitchen cabinets are now in.  This installation was quite a fun time for me as I literally just sat back and watched the men work.  Afterall someone had to make sure they did it right.  He he he.

We are now waiting on the benchtop, which will hopefully be installed next week.

Erin painting above front door

Remember our paint dilemma?  Thankfully we finally decided on a colour, after umming and ahhing for what felt like forever.  Sorry to those who voted for 'Hog Bristle' (for the name alone!) but in the end we went with Solver Vitesse and I love it!  It's a soft grey-ey brown (or is that brown-y grey?) and looks terrific with our gorgeous Jarrah floorboards (which are being sanded and polished as I write).

Sambo and Erin painting main bedroom

Mr C and I are also extremely lucky to have some amazing friends & family members who have been helping in various ways throughout the process - and we thank them profusely for all the help.

In fact, one mate was so keen to come over and start painting that he ran out of his house wearing mis-matched shoes.  A-huh.  Don't believe me?  Well...

Mis-matched shoes

Gotta love when they are that keen!  Might have to remember that when we start the vegie garden.  And the chicken coop.  And the bathroom.  And... uh oh.

That's it really.  Bit boring I know but it'll be over soon.  I promise to post the before and afters within the next few weeks.  It's different, I assure you!

Donktober

With all that going on, not much crafting has been happening, except for a few secret little projects in preparation for Donktober - due to start this coming Monday.  I hope you are all ready for a month of ridonkulousness!  I know I'm excited.  :)

Ok, seeing as I'm in such a good mood, I'll leave you with a little sneak peek of the first project on offer.

Pile of purple buttons

Ooo lots & lots of lovely buttons.  Come back on Monday to find out more.  ;)

E.
WIP Wednesday at Freshly Pieced

This post has been linked up to WIP Wednesday over at Freshly Pieced.   Check it out.

Tuesday, September 25, 2012

Fresh Squeezed Fabrics - Pin It to Win It!

Taken from I Have to Say

This is an interesting competition that I've only just come across, thanks to Heather's blog post (and then the rest of the WORLD!)

Apparently, it's as simple as this -

(1)  Head over to Fresh Squeezed Fabrics
(2)  Pin your favourite FQ bundle on Pinterest
(3)  Encourage people to re-pin your choice
(4)  Once you've received enough pins to match the dollar value of your choice - you win it!
(5)  Email freshsqueezefabrics@gmail.com

EASY!!!  But get onto it quick - closing date is this Thursday, 27th September.


I decided to play along and selected this gorgeous bundle of Bella.  Noice!  You can find my pin here.

AND, believe it or not, but I have already reached the 15 pins needed to score it.  Awesome.  Thanks to everyone who helped out.

If you're playing along too please leave me a comment and I'll more than happily help you out.

Fun!

UPDATE 26/9 - Due to the overwhelming response, the competition's deadline was brought forward and, consequently, is now closed.  Please see here.

E.

Sunday, September 2, 2012

S.A.L.E.

I've come across a few fabulous sales this weekend so thought I'd help spread the word.


First up is from the super-dooper Sublime Stitches who have 50% off (yes, you read that correctly!) all their patterns and more until Monday night (their time).  Just don't forget to enter the code at checkout - BACK_2_STITCHIN

Click here!

I have to admit that I succumbed to this deal - ordering one two four patterns last night, including the gorgeous new Kokeshi Dolls.


If you are more into sewing then what about whipping up some clutches, purses or handbags with Michelle Patterns?!  Using the code laborday you can score yourself 20% off.  Love it!

Click here!

I've made a few of her pocket clutches in the past and, honestly, the step-by-step patterns are fantastic.  Check them out.


Lastly, if you have been dying to extend your quilting library then look no further than the amazing sale over at C&T Publishing.  They have an array of books on offer, starting from just $2.  Wowsers!

In particular, I'm eyeing off Block Party - available for just $10.00.  That's less than half price!


So, there's my top three Labor Day specials.  For more information on sales, this weekend and year-round, check out Fabric Donkey.  I warn you, though, the temptation may prove too much.  ;)

Have fun shopping!

E.